Custom domains and HTTPS with Github Pages
One of the main reasons people point out to use a custom domain is that people will take your website more seriously. I personally just did it because it’s relatively cheap and because I wanted to learn on the process.
On this post I will try to explain shortly my (mis)adventures on setting up my own custom domain.
Using Google Domains
There are already excellent guides on how to set up your custom domain using Google Domains, such as How to set up Github Pages with Google domains, so I will not get too much into details on the whole process.
In short, the steps are the following:
Seting up and buying the Google Domain name.
Creating the CNAME file on your GitHub repository:
aldomann.com
www.aldomann.com
Setting up the Custom resource records

Custom resource records
The downside on using Google Domains is that the website will not be secured by SSL (meaning that it will not use the HTTPS protocol), as GitHub Pages doesn’t ordinarily support SSL on custom domains.
Using CloudFlare
Among many other things, CloudFlare’s services allow your users to access your site over SSL. The process is quite easy and straightforward:
- First of all, we need to create a CloudFlare free account. When asked, we need to enter the custom domain URL.
- CloudFlare will assign us two DNS name servers that you will have to configure in our Google Domains account:

DNS name servers - Then we will add three DNS Records on CloudFlare’s
DNSsection: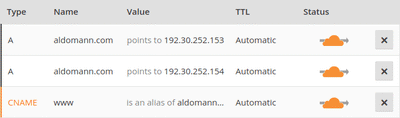
Custom resource records - Finally, we need to force SSL using CloudFlare’s
Page Rules:
Page Rule to force SSL
For more detailed information on SSL and other tips, you can check CloudFlare’s blog.
Issues after enabling HTTPS
After enabling SSL on CloudFlare, you will probably (at least I did) have issues with mixed content (i.e. images, CSS and JavaScript files are using HTTP instead of HTTPS). This means that your connection to the website isn’t secure, which is precisely what we wanted to solve by using CloudFlare.
Trying to find solutions for this problem, I found gauntface’s answer on GitHub the key to fix this issue, forcing Jekyll to replace http:// for https://. In practice, we need to use
<link rel="stylesheet" href="{{ '/assets/css/main.css' | prepend: site.github.url | replace: 'http://', 'https://' }}">
instead of the usual
<link rel="stylesheet" href="/assets/css/main.css">
Unfortunately, you will have to do this on all your calls to CSS, JavaScript files, images, etc. It’s a pain in the arse, but it can be lessened if you use includes on for your images.
But wait…
Writing this post I discovered that apparently, if you are using CloudFlare, which I am, you can also take advantage of Automatic HTTPS Rewrites.
Just tried it and it seems to works (needs more testing though), meaning that I didn’t really need to use replace: inside every call to CSS, JS file or image… At least I had fun 🤷♂️